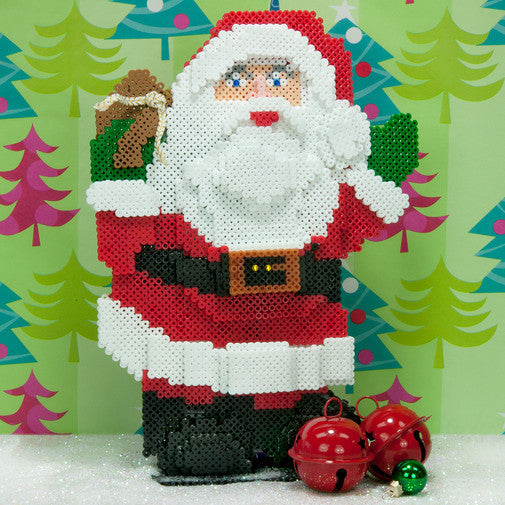
Instructions
Step 1
Bead Colors Needed:
Sand - 44
Peach - 5
Red - 1417 - 2 bags
Gold Metallic - 58
Dark Green - 280-19
Pastel Blue - 2
Light Brown - 119
Brown - 403
Grey - 43
Black - 1900 - 2 bags
White - 2296 - 3 bags
See the Supply List for beads and tools you can purchase.
You will also need:
Gold and white braided cord
blue and gold self-adhesive gems - 2 each
Quick-drying adhesive
Step 2
Download the PDF for the 3D Santa Project Pattern. You will use the super-size pegboard for your project. Your Santa will be built in layers to add dimension such as Santa's belly, his beard, fur trim on his suit, and his boots. To save beads, areas on some layers will be hollow.
Step 3
In order to keep these super-size pegboard patterns at actual size, we have split each one to span two pages. Follow the instructions on each page for cutting and aligning the pattern halves into one pattern. Slide the pattern under the pegboard, then place your beads as indicated.
Step 4
Ask an adult to fuse your designs. Place your pegboard on a flat, heat-safe surface. Set a household iron to the medium setting. When fusing a large design like this, you will obviously need to iron sections at a time. It will be helpful to place a piece of cardboard or matboard over the part of the design that is not being fused at the moment and weight it with a heavy book. This will keep the beads from being bumped out of position while you fuse the other area. Then just carefully shift the cardboard and weight as you fuse more and more of the design.
Place ironing paper over the pegboard. In a circular motion, begin to iron the project. When ironed properly, the beads will still have open centers. DO NOT OVER-IRON as this will cause the beads to close and can make assembly of your project more challenging. Let the design cool.
Step 5
Remove the paper and bead design from the pegboard. Flip the design over to expose the non-fused side. Repeat step two. Let cool completely. Once the design is cool, peel off the ironing paper. Your pegboards and ironing paper are reusable.
Note: Beads need heat for about 10-20 seconds per side to fuse evenly. Lift the paper occasionally to see how the beads are fusing. Additional heating time may be required.
Step 6
ASSEMBLY: NOTE: Create the pieces in the order that the patterns are shown in this project sheet. We recommend that you assemble as you complete each pattern sheet to avoid confusing the pieces. When there are multiple layers in one area, position the pieces the way you want them, then glue.
Glue Layer 1 to the base. Aligning the boots, add Layer 2.
Step 7
Position the Hat Fur piece on the brim of Santa's hat and glue.Glue the smaller Hat Pompom piece on top of the larger one, then glue to the hat, turning it at a slight angle.
Step 8
Make 2 Mustache pieces and glue together, then glue below Santa's face.
Step 9
Glue the Left Arm in place, then add the Left Sleeve Cuff. Glue the Right Sleeve Cuff in position. Aligning the belt, glue the Belly and Beard piece in place. Centering the Beard 1 over the Belly and Beard, glue it in place. Add the Beard 2 and Beard 3 pieces in order to the center of the beard area of the design. At the center of the belt, glue Buckle 1 then Buckle 2 in place.
Step 10
Before gluing, Layer the Coat Fur pieces in order, starting with piece 1 at the left, then 2 at the right. Continue working from side to side, overlapping pieces and building toward the center. Piece 5 is at the center and piece 6 directly on top of it. Once you know how you want it to look, glue the pieces in place.
Step 11
Layer the pieces in order of each boot and glue in place on your Santa, all pieces but the last one align at the bottom. Glue the two stand pieces together. Slide Santa's boots into the openings to make him stand. Glue as needed.
Step 12
Glue two blue gems to Santa's eyes, and two gold gems to his belt buckle. Tie the braided cord into a knot and glue to his pack.