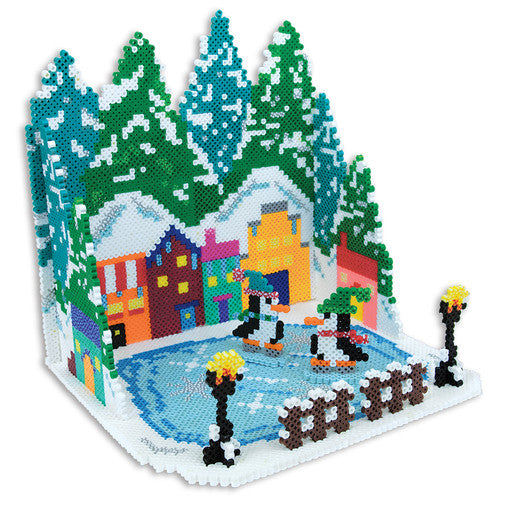
Step 1
Bead Colors Needed:
Pink - 32
Blush - 78
Red - 100
Cranapple - 154
Yellow - 44
Cheddar - 218
Orange - 93
Toothpaste - 1277 - 2 bags
Light Green - 150
Parrot Green - 713
Dark Green - 909
Light Blue - 252
Dark Blue - 75
Pastel Lavender - 10
Brown - 108
Grey - 42
Black - 171
White - 2556 - 3 bags
Pink Candy Stripe - 2
Cinnamon Stripe - 15
Fire Stripe - 2
Buttercream Stripe - 84
Cucumber Stripe - 61
Sky Blue Stripe - 30
Grape Stripe - 54
Silver Pearl Stripe - 241
See the Supply List for beads and tools you can purchase.
You will also need:
Scissors
Clear tape
Step 2
Download the PDF for the Cool Christmas Project Pattern. You will need 4 large square pegboardsŃsome of the patterns require 2 or all 4 of the pegboards assembled together as shown in the project sheet. Cut these patterns out and tape together in the same way. If you are using clear pegboards, slide the actual-size patterns underneath them. Place your beads on the pegboards as shown.
Step 3
Ask an adult to fuse your designs. Place your pegboard on a flat, heat-safe surface. Set a household iron to the medium setting. Place ironing paper over the pegboard. In a circular motion, begin to iron the project. When ironed properly, the beads will still have open centers. DO NOT OVER-IRON as this will cause the beads to close and can make assembly of your project more challenging. Let the design cool.
Step 4
Remove the paper and bead design from the pegboard. Flip the design over to expose the non-fused side. Repeat step two. Let cool completely. Once the design is cool, peel off the ironing paper. Your pegboards and ironing paper are reusable.
Note: Beads need heat for about 10-20 seconds per side to fuse evenly. Lift the paper occasionally to see how the beads are fusing. Additional heating time may be required.
Step 5
ASSEMBLY: Penguins: Slide penguins' feet into the stands.
Step 6
Lamp Posts: Turn the two lamp post pieces perpendicular to each other slide together at the slots.
Step 7
Final Assembly: Holding the left side perpendicular to the front piece, slide the two pieces together along the long slots on each. Do the same with the right side.
Insert the tabs of these assembled pieces into the slots in the base. Insert the lamp posts and fence pieces into the base. Place the penguins on the pond.