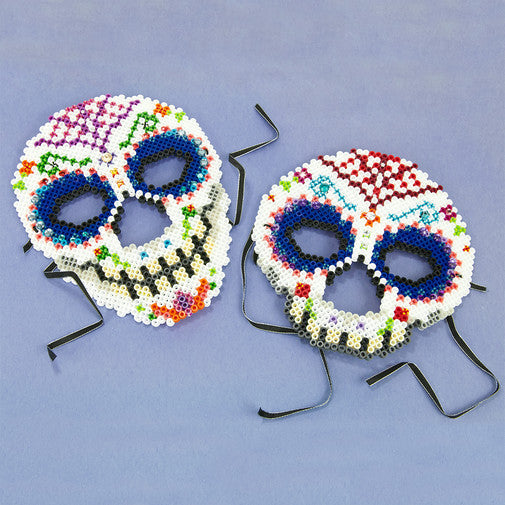
Step 1
Bead Colors Needed for the Full Mask:
Plum - 39
Orange - 18
Turquoise - 20
Dark Blue - 94
Glow in the Dark Green - 38
Creme - 48
Grey - 8
Dark Grey - 23
Black - 71
White - 428
Raspberry Pearl Stripe - 24
Hot Coral Pearl Stripe - 38
Fire Stripe - 5
Prickly Pear Pearl Stripe - 16
Cucumber Stripe - 34
Royal Blue Pearl Stripe - 30
Grape Stripe - 6
Zebra Stripe - 2
Bead Colors Needed for the Small Mask:
Red - 32
Cranapple - 39
Orange - 4
Dark Blue - 92
Pastel Lavender - 22
Glow in the Dark Green - 15
Creme - 26
Grey - 8
Dark Grey - 23
Black - 66
White - 309
Hot Coral Pearl Stripe - 38
Fire Stripe - 3
Prickly Pear Pearl Stripe - 16
Sky Blue Stripe - 34
Royal Blue Pearl Stripe - 30
Zebra Stripe - 2
See the Supply List for beads and tools you can purchase.
You will also need:
Scissors
Clear tape
Black ribbon - four 12 inch pieces
Assorted adhesive gems
Step 2
Download the PDF for the Sugar Skull Masks Project Pattern. You will need 4 large square pegboards assembled together as shown in the project sheet. Cut the patterns out and tape together in the same way. If you are using clear pegboards, slide the actual-size patterns underneath them. Place your beads on the pegboards as shown.
Step 3
Ask an adult to fuse your designs. Place your pegboard on a flat, heat-safe surface. Set a household iron to the medium setting. Place ironing paper over the pegboard. In a circular motion, begin to iron the project. When ironed properly, the beads will still have open centers. Fuse the mask securely on ONE SIDE ONLY so that the mask will curve around the face more easily. Let cool. Your pegboards and ironing paper are reusable.
Note: Beads need heat for about 10-20 seconds per side to fuse evenly. Lift the paper occasionally to see how the beads are fusing. Additional heating time may be required.
Step 4
ASSEMBLY: Tip: Use a 5 inch piece of thin fishing line to create a loop as shown. This will help thread your ribbon through the beads for the mask ties. Insert the fishing line loop through the designated bead hole from front to backŃsee placement indicators in the project sheet. Pass the end of the ribbon through the loop.
Step 5
Gently pull the ribbon through the bead. Repeat with the adjacent bead to bring the ribbon to the back.
Step 6
Knot the ribbon to secure it on the back.
Step 7
Embellish your masks with adhesive gems around the eyes and forehead.
